Product guide
How to use Tax Tidy
Six steps from statement import to accountant handoff. Screenshots use dummy business data. Tax Tidy helps organise records and prepare summaries; it does not provide tax, legal, or financial advice or lodge BAS.
Some light mode screenshots could not be loaded, so matching dark screenshots are shown for those images.
-
1
Import your statement files
Choose the workspace you want to work in, then open Import. Upload QIF statement exports, confirm the file and row detection, and keep only the imports that belong in the workspace.
- Use one workspace per entity or record set.
- Check the file name, imported date, and rows detected before working forward.
- Delete any file that should not feed into later pages.
 Click to enlarge
Upload statements and confirm imported files are ready for checking. -
2
Check processed statement rows
Open Statements to inspect the processed rows for each imported QIF statement. Select a statement, filter the rows, and use Include in Transactions to control whether it flows into Transactions, Tax, and Reports.
- Filter by description, date range, or amount to check suspicious rows.
- Archive statements you want to keep out of active work, and restore them if needed.
- Leave Include in Transactions on only for statements you want included downstream.
 Click to enlarge
Check processed statement rows and choose what flows into Transactions. -
3
Categorise and check transactions
Use Transactions to review category totals, inspect source rows, add cash transactions, work through suggested rules, and prepare accountant handoff exports.
- Select a category to see the matching transactions.
- Use filters and row details to investigate unusual amounts.
- When the records are ready, use Export to Excel to create the accountant handoff workbook.
 Click to enlarge
Work through categories and export handoff material when records are reviewed. -
4
Manage categories and matching rules
Open Manage Categories to maintain the category tree and matching keywords that keep future imports grouped consistently. Use Tax for BAS codes and GST treatment.
- Create categories that match how you want to report.
- Add keyword rules for repeat suppliers or descriptions.
- Use the rule direction setting when a keyword should match credits, debits, or both.
 Click to enlarge
Manage Categories keeps recurring transactions grouped consistently. -
5
Prepare Tax and BAS totals
Open Tax, then use Tax > Category tax settings for BAS codes and GST treatment or Tax > BAS worksheet to choose a reporting period and refresh GST totals. The worksheet separates sales, capital purchases, non-capital purchases, GST on sales, GST credits, and wage-related BAS fields where relevant.
- Start with this quarter, last quarter, or financial year to date.
- Check missing receipt evidence before final review.
- Use BAS checks and source rows to trace each figure back to the underlying transactions.
 Click to enlarge
Use Tax to refresh a BAS period and review the calculated buckets. -
6
Export the accountant-ready workbook
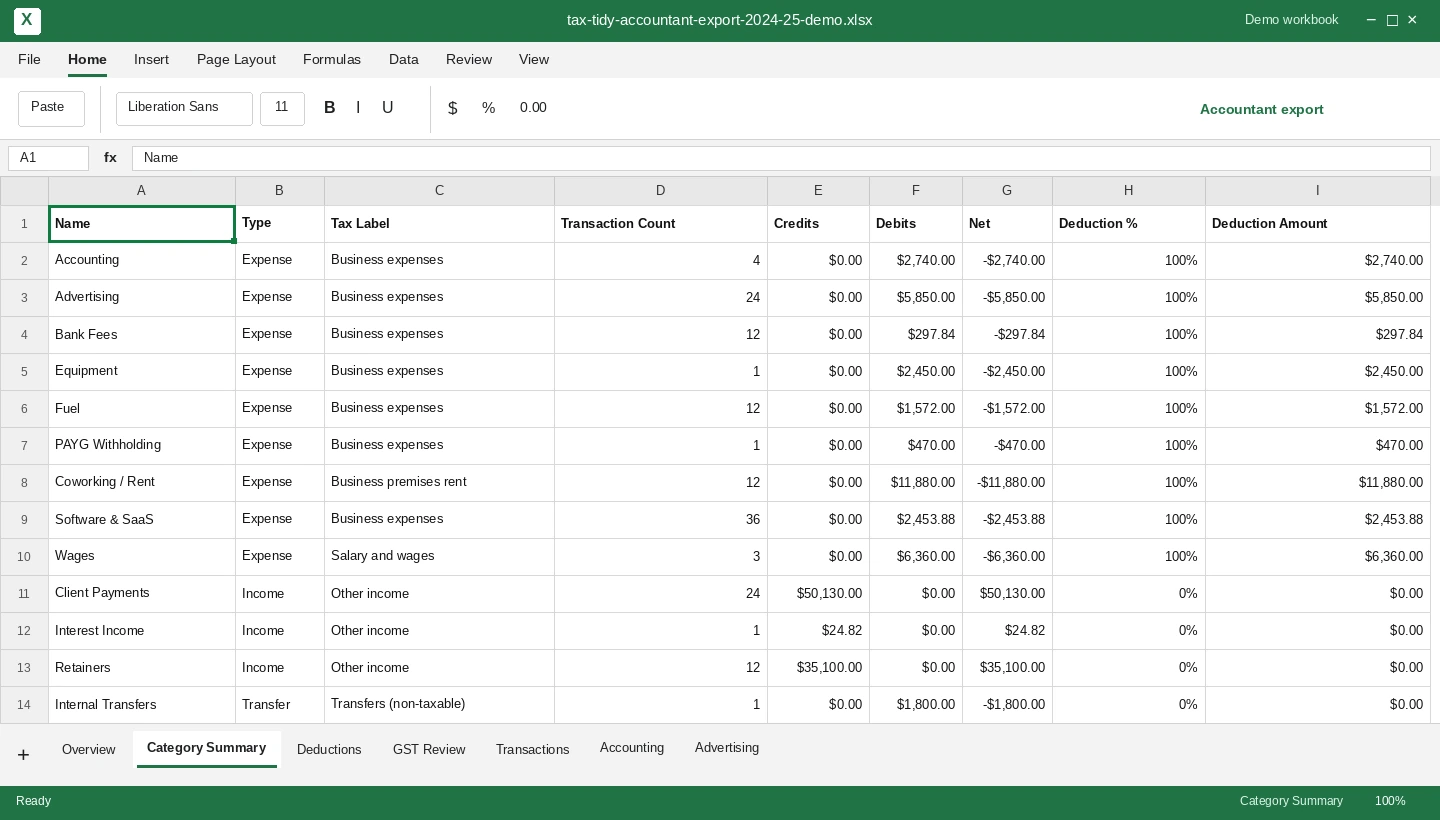
Open the generated Excel workbook for a final check before handoff. The export gives your accountant an Overview, Category Summary, Deductions, GST Review, Transactions, and category-level sheets built from the reviewed workspace records.
- Confirm the workspace, financial year, and high-level totals on the Overview sheet.
- Review Category Summary, GST Review, and Transactions for unexpected gaps or outliers.
- Send the .xlsx workbook to your accountant when the organised records are ready for their review.
 Click to enlarge
Preview the generated Excel workbook that is handed to your accountant.


Need help with a step?
Send the tab name and a short description of where you are stuck. Support can help map your screen to the workflow above.
Contact support